
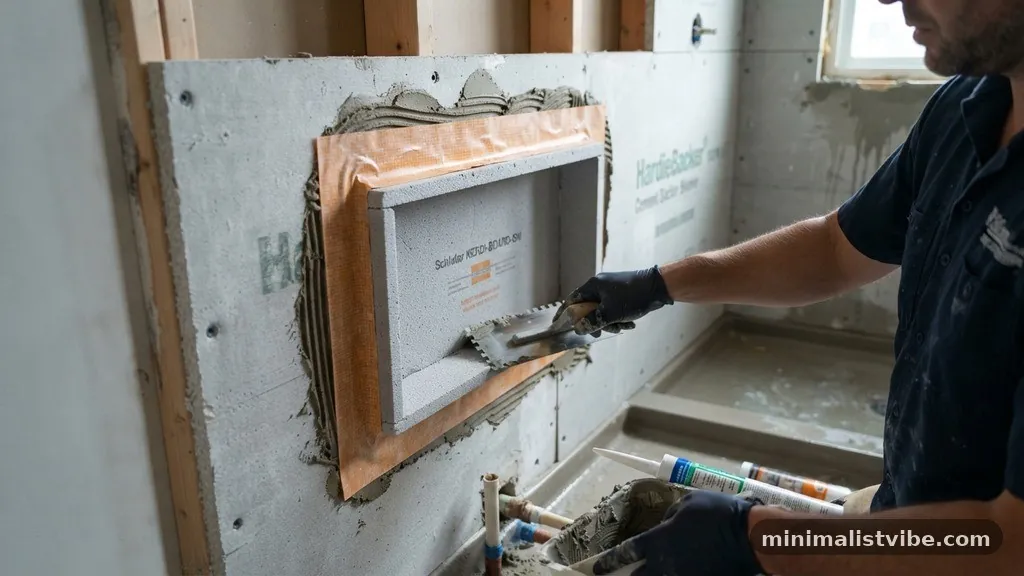
How to Waterproof Behind a Pre-Fab Foam Shower Niche Insert
Waterproofing behind a pre-fab foam shower niche insert is the most critical step in preventing long-term structural water damage in your bathroom. While these units are designed to be lightweight and easy to install, they rely entirely on the integrity of the surrounding wall assembly to keep moisture out of your wall cavity.
By understanding the specific requirements for sealing the flange to your substrate and ensuring a continuous barrier, you’ll protect your home from mold, rot, and costly repairs. This guide explains the technical steps needed to secure your niche so you can complete your renovation with total confidence in its longevity.
Understanding the Role of the Niche Flange
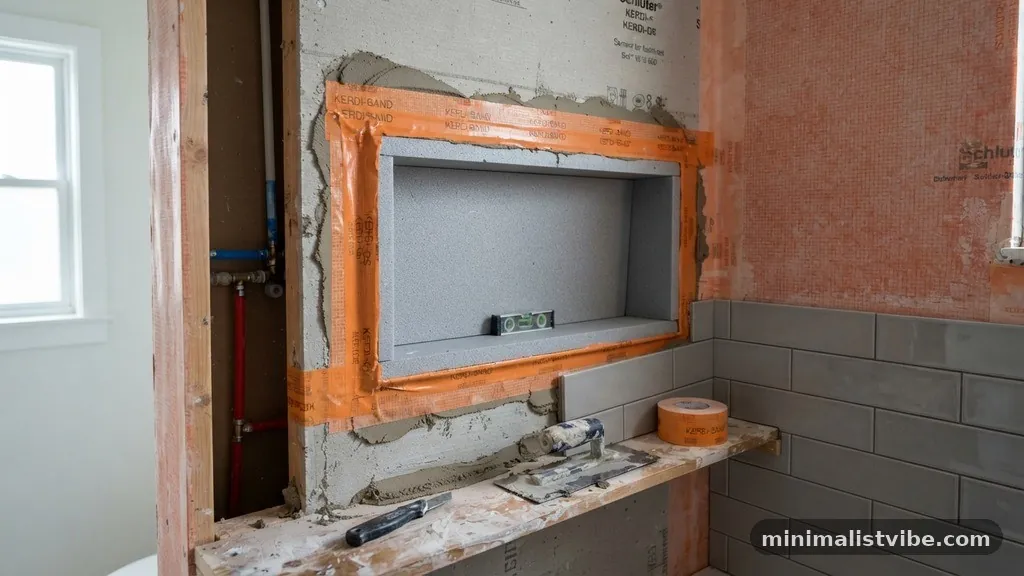
The flange is the flat, perimeter edge of the pre-fab foam shower niche insert that sits against your wall studs or backer board. Its primary job is to create a transition point between the niche and the wall waterproofing system.
When you install these units, you are essentially creating a hole in your moisture barrier; the flange is how you patch that hole back together. If you fail to seal this connection properly, water will migrate behind the niche, soak your insulation, and eventually rot the wooden studs behind your tiles.
A common mistake is treating the flange as a structural support rather than a waterproofing element. The foam itself is waterproof, but the seam where the foam meets your cement board or liquid-applied membrane is a high-risk zone.
You must treat this entire perimeter with the same care as you would a pipe penetration or a corner seam. By ensuring the flange is flush against the substrate, you minimize the gap that sealant or thin-set needs to bridge, creating a much more stable surface for your tile installation later on.
Preparing the Substrate for Installation
Before you even think about placing the insert, the cavity must be perfectly clean and square. Any debris, dust, or jagged edges on your backer board will prevent the adhesive or sealant from bonding correctly.
Use a vacuum to remove all dust from the wall cavity, as even a thin layer of drywall or cement dust can compromise the bond of your waterproofing materials. If your wall studs are slightly off-center, you may need to add blocking to ensure the niche sits perfectly level and flush.
Check that your niche wall is plumb and square before finalizing the placement. If the insert is sitting at an angle, your tile grout lines will look crooked, and more importantly, the water drainage inside the niche will be affected.
You want the bottom of the niche to have a slight downward pitch, usually about an eighth of an inch, to ensure that water drains toward the shower and not back into the wall. This subtle slope is a professional detail that separates a long-lasting installation from one that traps moisture.
Selecting the Right Sealant and Membrane
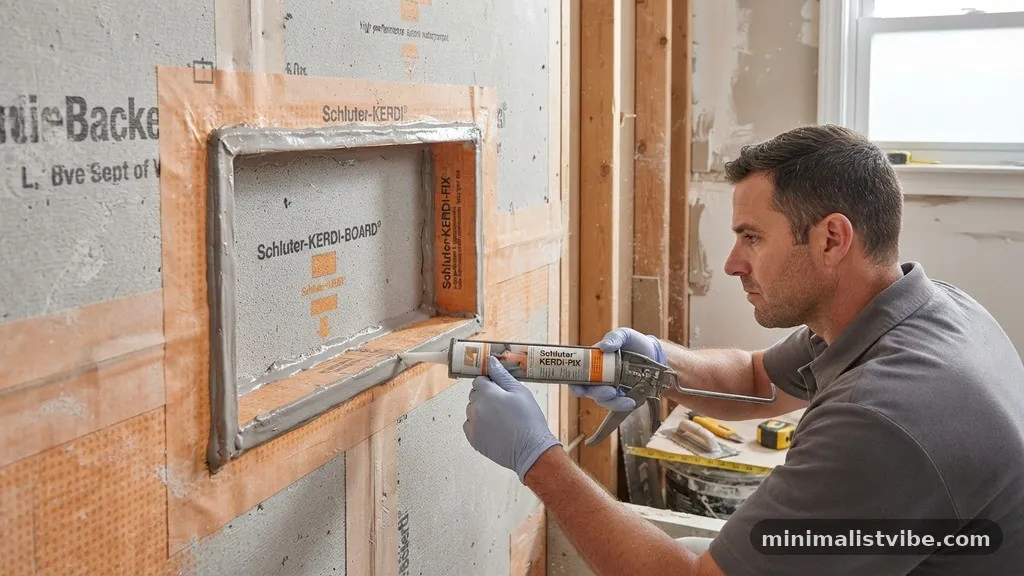
Not all sealants are created equal, and using the wrong product is a frequent cause of failure. You must use a manufacturer-approved sealant that is compatible with both the foam material of the niche and your specific wall waterproofing system.
Many foam niche manufacturers provide a proprietary polymer-based sealant that is designed to bond to their specific material. Using standard silicone from a big-box store might seem like a good idea, but it often lacks the structural bond strength required for a heavy tiled assembly.
If you are using a sheet-membrane system, such as Schluter-KERDI, you will need to incorporate that specific membrane into your waterproofing strategy. You can find detailed technical guidance on these systems at the Tile Council of North America, which provides industry standards for tile installations.
By following these established protocols, you ensure that your materials are chemically compatible and perform as a single, unified system. Always check the technical data sheet for your niche to see if it requires a specific type of modified mortar or a specialized sealant for the seams.
Applying Adhesive to the Flange
When you are ready to secure the niche, apply a generous bead of the manufacturer-recommended sealant to the back of the flange. Do not use thin-set mortar to bond the foam flange directly to the studs if the manufacturer specifies a sealant, as the expansion and contraction rates of the two materials differ. The goal is to have a continuous bead that squishes out slightly when you press the niche into place, confirming that you have achieved a full, gap-free seal around the entire perimeter.
Avoid the mistake of leaving gaps in your adhesive bead. Even a small, one-inch section of unsealed flange can allow enough moisture to infiltrate the wall cavity over time to cause significant damage.
Once the niche is pressed into place, use a flat trowel or a putty knife to smooth out the excess sealant that has squeezed out. This creates a ramped transition that makes it much easier to overlap your subsequent waterproofing layers.
Integrating the Niche with Wall Waterproofing
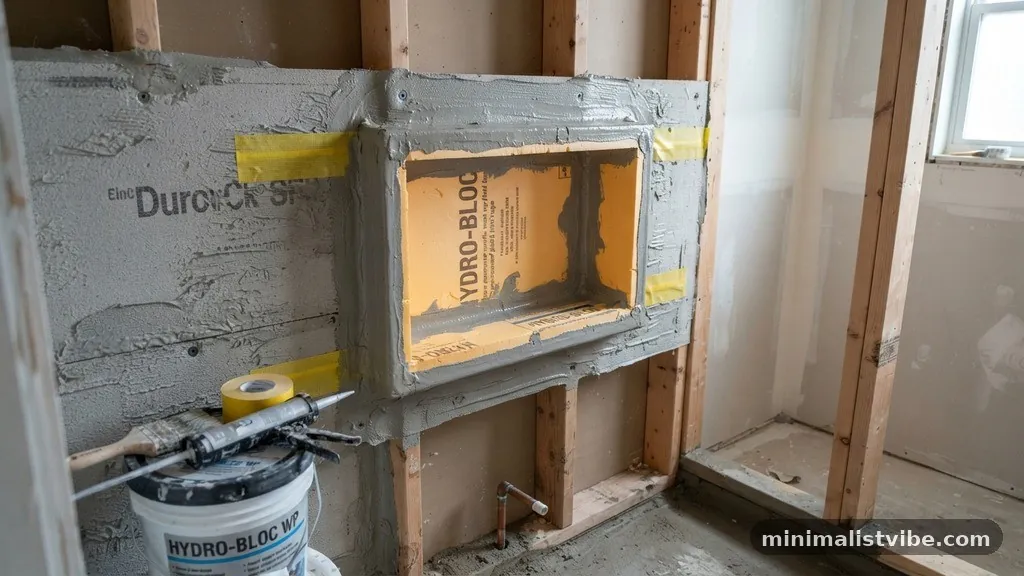
The most important phase of waterproofing behind a pre-fab foam shower niche insert is the integration phase. Once the niche is physically secured to the studs and the flange is sealed, you must bridge the gap between the flange and the wall backer board.
If you are using a liquid-applied membrane, you should apply a coat over the flange and extend it at least two inches onto the surrounding wall. This creates a continuous, monolithic barrier that prevents water from ever reaching the stud cavity.
If you are using a sheet membrane, cut strips of the membrane to overlap the flange and the wall board. Use thin-set mortar to embed these strips, ensuring there are no air pockets beneath the fabric. Pay close attention to every corner seam where the niche meets the wall.
These inside corners are the most likely places for leaks to develop, so consider using pre-formed corner pieces if they are available for your system. These pieces eliminate the need to fold membrane into tight, difficult angles, which reduces the chance of a tear or an improper seal.
Managing the Niche Slope and Drainage
A properly installed niche should always have a slight downward angle on the bottom shelf. While many pre-fab units come with a built-in slope, it is your responsibility to verify it during installation.
If the niche is installed perfectly level, water will collect in the back corners, leading to mildew and potential breakdown of your tile grout. By checking the slope with a small level before the adhesive sets, you can ensure that the niche slope is sufficient to shed water effectively.
If you find that the unit is sitting flat, you can use a small amount of thin-set to build up a slight pitch on the bottom shelf before tiling. However, it is always better to get the angle right during the initial mounting phase.
Remember that once you add tile and grout, the weight will settle the assembly slightly, so verify your measurements one last time before the mortar fully cures. This attention to detail ensures that your shower niche remains a dry, clean space for years to come.
Waterproofing Every Corner and Seam
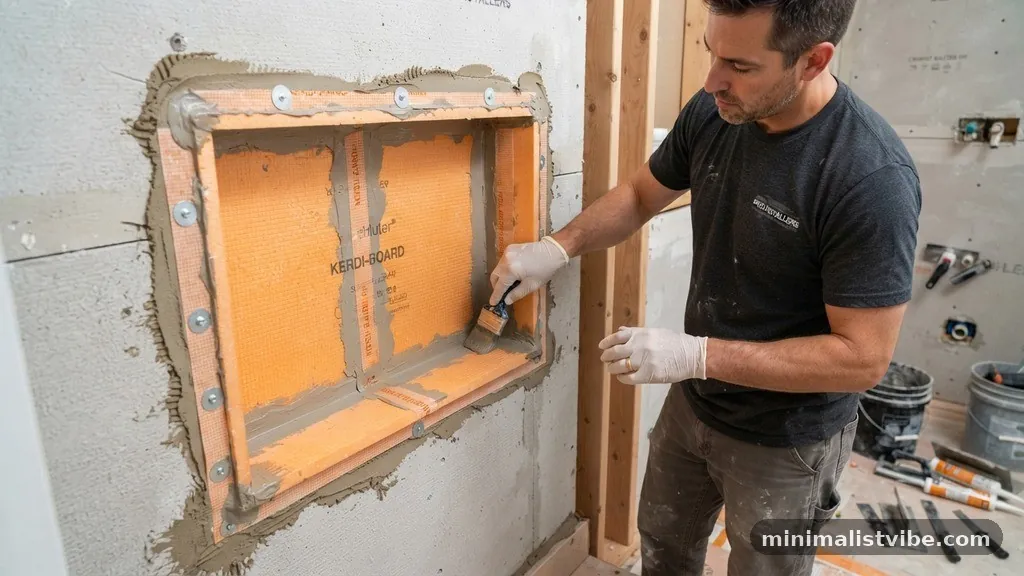
Every seam is a potential point of failure. When working with a pre-fab foam insert, the joints between the foam panels and the joint where the niche meets the wall are the primary targets for water infiltration.
You must treat every corner seam with a reinforcing tape or membrane. If you are using a liquid system, use a reinforcing fabric mesh embedded in the wet membrane at every corner to prevent cracking as the building shifts over time.
Do not skip this step, even if the niche manufacturer claims their product is waterproof on its own. The interface between the niche and the wall is a separate connection that requires independent waterproofing.
By ensuring that every corner seam is fully covered and sealed, you create a waterproof envelope that protects the entire shower assembly. Take your time with this process, as rushing through the corners is where most DIYers make their biggest mistakes.
Testing Your Waterproofing Integrity
Before you begin tiling, it is a smart practice to perform a flood test or a simple visual inspection of your work. While a formal flood test is usually reserved for shower pans, you can check your niche by carefully inspecting the seals for any pinholes or thin spots in your membrane. If you used a liquid-applied system, look for areas where the color is lighter, which indicates a thin application that may not provide the necessary thickness for a full waterproof barrier.
If you identify a suspicious spot, don’t ignore it. Simply apply another coat of the waterproofing material, extending it well beyond the area of concern.
It is much easier to add another layer of membrane now than it is to tear out finished tile and grout later because of a leak. A little extra time spent on this inspection phase provides peace of mind and significantly increases the lifespan of your shower walls.
Common Mistakes to Avoid
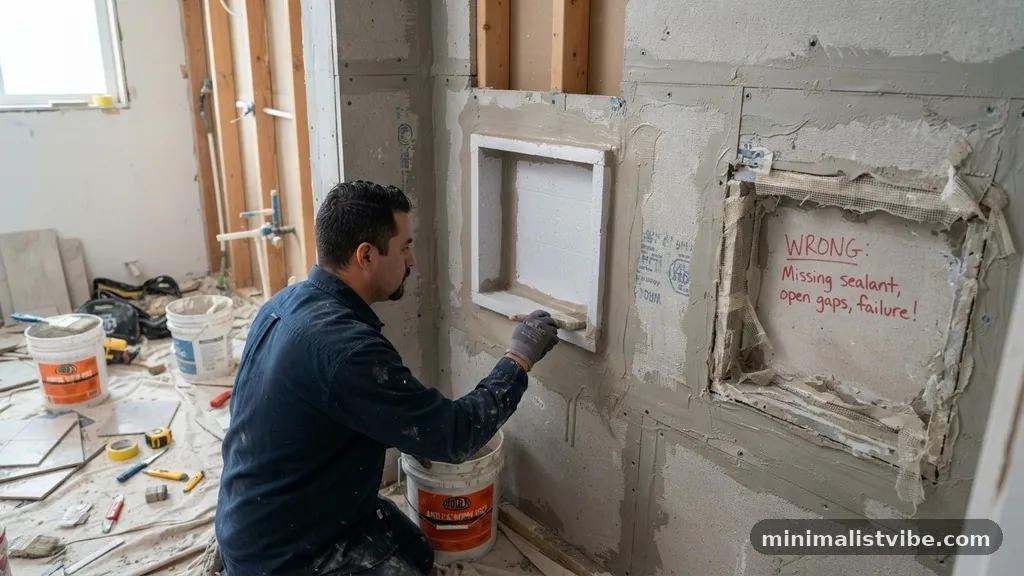
One of the most common errors is using standard drywall screws to secure the niche flange directly into the studs. While it might feel like it’s holding the unit in place, these screws create tiny holes in your waterproofing layer. If you must use fasteners to hold the niche in place while the adhesive cures, ensure they are placed outside the primary waterproofing zone or that they are thoroughly covered with a liberal amount of sealant.
Another mistake is failing to account for the thickness of the tile. If your niche is too deep, your tile might look recessed and awkward, but if it is too shallow, you may have trouble wrapping the tile edge around the niche wall.
Always dry-fit your tiles to see how they interact with the niche perimeter before you finalize the installation. Additionally, avoid using organic mastics for tiling inside the niche; always use a high-quality thin-set mortar that is rated for wet environments, as mastics can re-emulsify when exposed to constant moisture.
Long-Term Maintenance of Tiled Niches
Once the shower is in use, the maintenance of your niche depends on the quality of your tile grout. Use a high-quality, stain-resistant grout that is designed for wet environments.
While the waterproofing you installed behind the tile will protect the wall structure, the grout itself is the first line of defense. If you notice the grout cracking or crumbling, repair it immediately to prevent water from working its way toward the tile backer board.
Clean your niche regularly to prevent the buildup of soap scum, which can hold moisture against the grout and tile surface. Keeping the niche clean ensures that it stays dry between showers, which is the best way to prevent mold and mildew growth. By keeping the interior of the niche free of debris and ensuring the grout remains intact, you will get the maximum life out of your installation.
Frequently Asked Questions
Do I really need to waterproof the entire wall if I have a pre-fab foam niche?
Yes, the niche is only one part of the system. Even if your niche is perfectly waterproof, water can still penetrate through the grout lines of your surrounding shower walls. You must treat the entire shower wall as a single, continuous, waterproof zone to protect the underlying studs and insulation.
Can I tile directly over the foam flange of the niche?
You should not tile directly onto the raw foam. The foam is a substrate that needs to be integrated into your waterproofing system first. Once you have applied your membrane or sealant over the flange and the surrounding wall, you can then proceed to thin-set your tiles directly onto that waterproofed surface.
Is it necessary to use a special corner tape for the niche seams?
Using a specialized corner tape or pre-formed corner pieces is highly recommended. These materials are designed to handle the stress of corner transitions without tearing or bunching up. They provide a much more reliable seal than simply trying to fold a sheet membrane into a tight ninety-degree angle.
What happens if I use the wrong sealant for my niche?
Using the wrong sealant can lead to a loss of adhesion or chemical degradation of the foam. If the bond fails, water will bypass the flange and enter the wall cavity. Always use the manufacturer-recommended sealant to ensure chemical compatibility and long-term durability.
How do I know if my niche is sloped enough for proper drainage?
You can check the slope by placing a small level on the bottom shelf of the niche. A slight downward pitch of about an eighth of an inch is ideal. If you find the niche is perfectly level, you can build up a small amount of thin-set to create the necessary pitch before you begin tiling.
Conclusion
Waterproofing behind a pre-fab foam shower niche insert is a manageable task that demands precision and the right materials. By focusing on the integrity of the flange seal, ensuring a slight downward slope for drainage, and creating a continuous moisture barrier with your wall system, you prevent the most common causes of shower failure. Remember that the niche is only as strong as its weakest connection point, so take your time with those corners and seams.
Following these professional steps ensures your renovation remains a highlight of your home rather than a source of future headaches. If you have any remaining questions about your specific installation or material choices, feel free to reach out for further clarification as you prepare to build your dream shower.